Hip Recovery
For the past five years, I have been running my own yoga school and have had students who have presented with ankle, knee and hip replacements. However, for the first time, I have a student who has just had a full hip replacement procedure. She is a keen student and, when the time is right, will be ready to return to the mat.
To support her to safely return to her yoga practice, I decided to do an assignment on hip replacements. This is to:
1. Improve my understanding of the anatomy and physiology of the hip joint
2. Improve my understanding of what happens during a hip replacement procedure
3. Understand how other yoga teachers have worked with their own hip replacements
4. Be clear which āsana and pranayama may support her recovery.
As part of the research for this assignment, I interviewed two yoga teachers who have had different types of hip replacements. One had her hip replaced six years ago and the other is less than a year out of surgery.
The aim was to provide a practical, lived experience of what it feels like to have a hip replacement and how it impacts someone, both physically and emotionally.
For the purpose of this assignment, I have focused on a woman’s anatomy.
What is the structure of a woman’s hip?
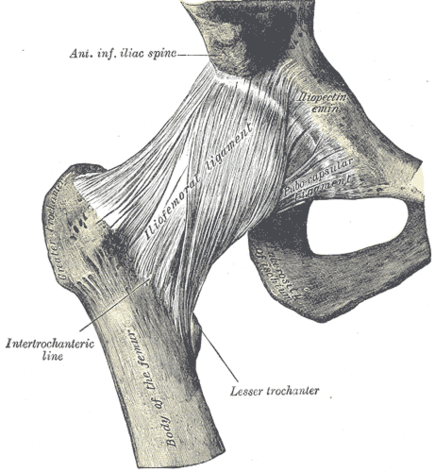
The hip joint is a ball and socket joint. Anatomically, the socket is referred to as the acetabulum and is to the side and at the lower part of the pelvic bowl. While you can’t feel the acetabulum, you can feel the bony protuberance just below that joint that sometimes bumps into things. This is called the greater trochanter of the femur.
The head of the femur (thigh bone) fits into the acetabulum of the pelvis (see image below).

The pelvic bone is made up of three key bones – the ilium (top), the ischium (back), the pubis (front). These bones fuse during adolescence to form a solid, supportive structure. The sacrum, at the base of the spine, connects the two halves of the pelvis at the sacroiliac joints.
Muscles around the pelvic bowl provide the foundation for all movement of the thighs in the hip joints. These movements include flexion, extension, abduction, adduction and rotation.
Major muscles of the hip include the gluteal group (gluteus maximus, medius, and minimus), which extends, abducts, and rotates the hip. Meanwhile the psoas and iliacus muscles (known as the iliopsoas) create flexion in the hips. The iliacus runs from the pelvis to the upper part of the femur, while the psoas runs from the lumber spine to the femur. The adductor group (adductor longus, brevis, and magnus) pulls the leg toward the midline. The tensor fasciae latae and the deep rotator muscles also contribute to movement and stabilisation.
Along with the muscles and bones, there is a major tendon (which connects muscle to bone) called the iliotibial band (IT band), which is a tough band of connective tissue that runs all the way down past the knee.
Ligaments, such as the iliofemoral ligament (see image below), the pubofemoral ligament and the ischiofemoral ligament, connect bone to bone and prevent excessive extension and limit abduction and internal rotation.
How does a woman’s hip operate?
The hip supports the movement of the leg, helps us to bear weight on the leg and plays a role in childbirth. Both its mobility and stability is crucial for walking, running, sitting and postural balance.
Muscle activation is crucial for the stability of the hip as it coordinates movement and balance. While the gluteal muscles stabilise the pelvis during walking, the iliopsoas helps with leg lifting and forward movement. The communication between the brain and these muscles (neuromuscular control) is essential for smoothly transitioning the weight between both legs – e.g. in walking.
Interestingly the female hip is also influenced by hormones, particularly estrogen. Estrogen affects the elasticity of ligaments and connective tissues, contributing to increased flexibility. During pregnancy, the hormone relaxin further loosens ligaments, especially around the pelvis, to prepare for childbirth. This increase in joint laxity can enhance mobility but also raises the risk of instability or injury.
Blood supply to the hip comes primarily from branches of the femoral and obturator arteries, which nourish the femoral head and surrounding structures. Sensory and motor innervation arises from the lumbar and sacral plexuses, enabling control and proprioception of the hip region.
What causes people to need hip replacements?
The main cause of hip replacements is osteoarthritis. However, there can be other causes, such as when people fall, break their hip and, usually, there is osteoporosis present.
What happens during a hip replacement procedure?
In a hip replacement procedure, the damaged sections of the hip joint are removed and replaced. Once the damaged bone and cartilage are removed, artificial parts are inserted into the hip socket and on the head of the femur. They may be made of metal, hard plastic or ceramic.
During my interviews, I learnt that there are different ways that the surgeon can get into the hip joint. One teacher had anterior (front) surgery and another had a lateral (side) insertion. The student I am working with has had an anterior procedure.
This is a newer procedure that creates a smaller incision with less of the muscles cut. This anterior approach is supposed to lead to less muscle trauma, pain, less limping, an easier recovery and a decreased chance of hip dislocations.
Once a person has had their hip replacement, they will be on crutches for four to six weeks and are advised not to bear weight on the joint. Once they can bear weight, gentle, flat walking is advised.
How have yoga teachers with hip replacements approached their post-surgery recovery?
The key thing that stood out for me from both interviews with yoga teachers who have had hip replacements is that everyone’s experience of recovery is different. The way they go about their recovery depends on the individual, what procedure they choose to have and how they work with integrating the artificial protheses into their body.
One of the most important lessons both teachers learnt is to go slow and not rush back onto the mat. Both spoke of how the first integration of a yogic practice was to support their mental and emotional recovery before turning to the physical.
In the first three months following surgery, both teachers took a very gentle approach and both are clear that recovery takes at least 12 months before any major function improves.
One says: “It is major surgery and there is a mental and emotional adaptation you need to make afterwards. The first thing I focused on was my walking. I didn’t want to rush back to my yoga practice. For me, it was about drawing on practices that helped me trust myself again. The yamas and niyamas – being compassionate to myself.”
Both teachers cited pranayama as being an incredibly helpful practice in the early days post-surgery when moving around was too painful and one talked of how the breathing and compassion practices helped her learn to integrate the foreign objects into her body.
“It took me 12 months to feel like the artificial joint was part of me,” she says.
Interestingly, there are three common threads that surfaced in both interviews about the 12-month recovery process. They are:
1. Learning to walk again
When people have a hip replacement, they have to repattern their walking after the surgery. Because of the pain and lack of mobility and stability in the hip in the lead up to surgery, people go into the procedure limping.
Unless there is a conscious effort to repattern their walking, many people come out of surgery and continue with the same limp that they went in with.
While both were on crutches for six weeks, they advised that this will depend on the individual. One teacher was able to move about the house without crutches by five weeks but still used crutches when she was out and about so no one would bang into her. At eight weeks post-surgery, she was able to walk 21km on soft, flat ground.
For both yoga teachers I spoke to, the key focus of their āsana practice was on improving their walking. “You lose the ability to swing your legs when you walk,” one teacher says. “I couldn’t walk anywhere but I could bike 30km. There was a real feeling that the joint was strong but that the soft tissue was weak.”
Both teachers had different insertion points for their procedure so that informed their āsana practice. For example, the teacher who had a lateral procedure worked with one-legged standing poses, such as Vrksāsana and Utthita Hasta Padangusthasana to support the “lateral containment of the outer thigh”. She also worked with Vasisthāsana in the ropes to improve the length through the side of the body, which had shortened during before and after the procedure.
“Before I went in for surgery, my walking was down to a shuffle,” she says. “That’s why in those early days the mindful walking practice that we do with Peter Thomson was so valuable.”
Meanwhile, the teacher who had the anterior procedure was able to work into forward bends but any lateral āsanas, such as Ardha Chandrasana, were contraindicated.
“Once I was ready to practice standing poses, I took a lot of height. For example, working with Parsvottanasana to the banister railing or Prasarita Padottanasana on a table. Taking a lot of support allowed me to relax a bit into the poses.”
Interestingly, both teachers used Chattush Padasana and Setubanda (with bent legs) in the early days of their recovery to help switch back on the communication between the hips and the glutes.
Spending less time in poses was also a key consideration to recovery.
“It was all about working with the order and touch-and-go repetition. I steered away from long-hold timings.”
Post-surgery both teachers also spoke of learning how to get up and down off the floor.
2. Muscle atrophy
As a person’s walking degenerates in the lead up to surgery, most of the muscles around the femur and hip joint atrophy. For some people, such as one of the yoga teachers, their muscles turn off entirely pre-hip surgery and this process creates even more atrophy.
“I used my āsana practice to increase my stability first and in that the mobility followed,” she says. “I was retraining the muscles to engage around the pelvis and the back of the leg. I also focused on pelvic floor strengthening.”
This is because a hip replacement procedure disrupts the balance of the pelvis.
3. Risk of dislocation
For the first three months, post-surgery, there is a real risk of dislocation for people who have undergone hip procedures.
This was top of mind for both teachers when they got back onto the mat. Both acknowledge that they remain mindful of the fact that the artificial protheses can dislocate more easily.
It plays into their decision as to how, or even if, they practice any deep twists, such as Marichyasana III and Parivrtta Parsvakonasana.
For the teacher who is less than a year out of surgery, she wishes she had listened to her body more in the years leading up to the surgery and refrained from going to deep in the twists because bone was crunching on bone as there was no cartilage left. For the teacher who is six years post-surgery, she says she has had to accept that there are postures and long-timings that are no longer available to her because the prostheses don’t have the same articulation as a normal hip joint.
While the series below suggests some āsanas that are useful for hip replacement recovery, it all depends on where the insertion points for the surgery as to which muscles are weaker and need to be “switched on” and what a person’s individual experience is during and post-procedure. Āsanas for Hip Replacement Recovery (post the acute phase of three months)
1. Vrksasana
2. Utthita Hasta Padangusthasana I
3. Prasarita Padottanasana (with support – e.g. to chair and bolster)
4. Chattush Padasana 4. Supported Setubandha
5. Supported Pincha Mayurasana (with the three blocks)
6. Salamba Sirasana (using headstander)
7. Upavistha Konasana
8. Parsva Upavistha Konasana
9. Supta Padangusthasana I
10.Urdhva Prasarita Padasana
11.Savasana
Author: Kylie Bailey | Certified Iyengar Yoga Teacher | West Coast Yoga - Piha